Showing posts with label Tanks. Show all posts

27/03/2011

A year in review

Well, its been nearly a year since i last made a post to the blog!
The last year has been so hectic for me that writing the blog was often the last thing on my mind - major projects finishing at work, moving house (and the roof promptly falling in!), illness in the family and all the other little things in life have combined to mean that I often don't have time for much at all.

Anyway, I thought that i would put up a "year in review" post, so that you guys can see what i've been working on since my last update. Bear with me, because there are quite a few models to show - In fact, because of the number of models, I've only included one or two shots of each. If you want to see them in more detail, head over to Heretics Playground where there are more detailed photos of each of them...

Before we dive in to the pictures, I wanted to say a big thanks to all the people who emailed me with encouragement to getting back to the blog, but specifically Mike and John @ Santa Cruz and Mike from TerranScapes - Your words of encouragement were touching and meant a lot; so thanks to all of you :D

Now, models! First up, we have my pride and joy - The Forge World Macharius Vulcan. This model was heavily modified within the spirit of the original. The body is unchanged, but all of the gun barrels were replaced with etched brass barrels, the tow hooks were replaced with cast examples, the tow chain was replaced with jewellers chain and the handles (were appropriate) were replaced with more "in-scale" fine wire. I'm very proud of this model:

Unfortunately the casting was not of the quality that i usually expect from Forge World - the hull was severely twisted, necessitating significant re-shaping using hot water as well as a significant rebuild of the rear end. However, it all worked out in the end!

Next up we have the Tamiya Jagtiger Mid Production with Commander Otto Carius. Over the last year i've been becoming very interested in modelling WW2 tanks and this was the first proper example that i've put together. Whilst the colour scheme is not exactly right for the period I think that it basically captures the correct feel of this large and imposing tank. The tracks are Fruilmodellismo cast examples - they were so good i wont use anything else now. Because they are cast as individual links (which are then joined with wire) they are fully articulated like the real thing - they also have significant weight meaning that they sag like the real tracks as well!

Next up we have several models from Studio McVey - what can i say about these models that i haven't already said - they are the finest resin models anywhere in the world. The casting is amazing, the designs are sublime and Mike and Ali are wonderful people to deal with. If you havent
checked out their models yet, head over to the shop now and buy some! You wont regret it...

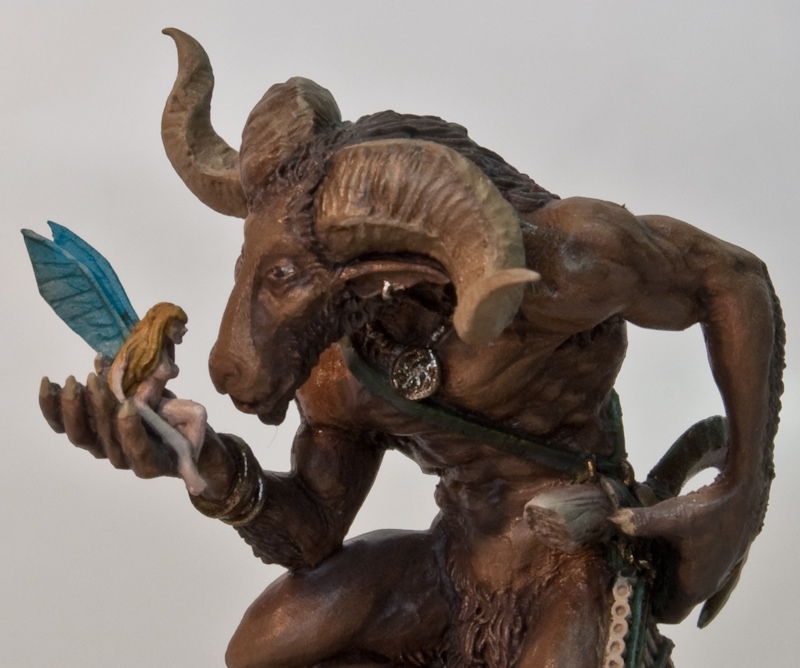
Finally we have a small mini from Hasslefree - Once again Kev White's sculpts are very fun to paint and provide a great "wind down" exercise after a longer job. For this model, I painted it after doing the Macharius and boy was it needed! Going from a project that took several months (oil paints take a long time to dry!) I needed something that would be quick and fun to paint - this is the reason i have a big stash of Hasslefree mini's in my cupboard!

I hope you have enjoyed this brief foray in to my work - I cant promise how often I will be back with updates, but Ill try to keep it updated as often as real life lets me. Until then, keep your brushes wet!


12/02/2009

Real life rhino...

Not gonna say much about this... I'm sure you all know about THQ's real life rhino... So, just enjoy the video

30/11/2008

Painting 3 Baneblades...(Part 1)

For a game of Apocalypse that me and friend have planned ive been working on a Steel Fury Apocalypse unit - this consists of 2 Baneblades and 1 Baneblade command tank - Yes, that is 3 Baneblades in one unit! As i was painting them, i took stage by stage photographs. These are included with a basic tutorial of how i painted the models.

Stage 1
Once i had bought and assembled the units (a very enjoyable experience i must say - the Baneblade really is one of the best kits ive ever put together), i undercoated each Baneblade with several coats of Chaos Black undercoat.


In total each model have around four or five coats on each part (two lascannon mountings, turret, Hull Heavy Bolter and main hull). I then left each Baneblade to dry for approximately 24 hours.

Stage 2
Next each Baneblade has Vallejo "Wolf Grey" lightly airbrushed over each panel, concentrating on the center of each panel


By the time i had finished the third tank, the first was dry, and i then applied a second light coat of wolf grey, covering mostly the same areas. If you havent tried using an airbrush on a tank before, i highly recommend it. The finish that can be achieved in far superior to brush painting, and other effects are easy to learn. Whilst there is some initial outlay (i use a Spray Master kit that i got on Ebay for about £70) the differnce it will make to your vehicles i vast. However, i digress....


After the second pass of "Wolf Grey" each tank then had a mix of "Wolf Grey" and "Stonewall Grey" airbrushed in to the very center of each panel, lightly. Sorry about the photo above - it came out a lot bluer than the actual tank is. Later photos show this more clearly.
One question that friends tend to ask me, is about the consistency of my paint when airbrushing - although this depends on the colour and the effect that you are after, normally i work at a 1:1 paint / water ratio. The paint ideally should be about the same thickness as semi skimmed milk. This is similar to the ratio of water and paint that i would use when brush painting, so i guess its habit more than anything.

Stage 3
Once the "Wolf Grey" basecoat was complete on all 3 tanks i gave each one a light dry brush using "Stonewall Grey" and "Bone White" mixed together, in varying amounts. Initially i focussed on wide areas using a high concentration of "Stonewall Grey" and then as i added more and more "Bone White" i concentrated more on the absolute hard edges


Stage 4
Painting the tracks and other metallic areas was next - I like to paint these in a mid grey to start with, as a good flat backing fot the mettallics and then work in the metal with the weathering and mud (shown in a future post!). The first thing i did here was to mask off any areas that could potentially catch the overspray from any parts. Main areas that i concentrated on were the tracks and the gun points


Once the areas had been masked off the exposed areas were given several light coats via airbrush of Vallejo "Cold Grey". Once this was dry, the masking tape was carefully peeled away


Stage 5
Once the Grey on the tracks was dry they were given a watered down coat of MIG Pigments "Standard Rust" pigment mixed with a lot of water. You can see the combination in the photos below


If you havent used MIG Pigments before, i highly suggest that you get hold of some. They are basically artists pastels ground up to a fine powder. You can make you own by rubbing a pastel on a piece of fine sand paper (this is something that i use later on in this tutorial, for "soot" effects on gun barrells etc). If you are using the pastel method, make sure that you dont buy oil based pastels as these are no good and will simply smear on your nicely airbrushed tank.
The mixture of pigment and water was then liberally splashed all over the tracks.


Once this first coat had dried a second coat was applied, using the same wash. You will notice that the pigment stains in a way very different from inks / washes. One thing that is very cool is that you can use a wet brush to move the particles of the pigment around, even after the wash has dried!

Once dry this gave a nice rusted effect to the tracks, as seen in the image below. Although not much of this rust effect will be visible once the mud and other debris has been added, it non the less gives a more "used" look to the tank where the tracks are visible


Stage 6
The next stage was to add mud effects to the track areas of the tanks. This was acomplished in several simple steps -

    First the entire underneath of the tank and the edges of the tracks and skirts were given a light airbrush of watered down Vallejo "Charred Brown" followed by a light airbrush of Vallejo "Earth". This gave a good base coat for the mud to come.


    A mix was then made of Vallejo "Plastic Putty", Vallejo "Charred Brown", Vallejo "Earth" and MIG Pigments "Basic Earth". I also mixed in a large handful of "Burned Earth" static grass. This was then liberally applied to the base, tracks and skirts, covering roughly the same area as the airbrushed in step 1, but leaving some of the base colour to show through. The Plastic Putty means that the mixture remains malleable for a good while (I usually find that the working time is about 10 to 15 minutes, depending on the exact ratios). This is usually more than enough time to get the mud down. I try to avoid key areas that would avoid mud in real life (If you look at real tracks, mud doesnt generally collect on the actual face plate of the tread, because it is constantly moving) and also try to avoid splashing mud too high up the side of the skirts - in real life, this is what the skirts help to do; prevent mud from getting in to the drive mechanism!


    Once the mud has dried it gives a very realistic effect, as can be seen in the photos below. The static grass especially give an extra dimension to this effect, and especially if you move the grass whilst the Putty is still wet you can achieve really great results!


    To be continued...

    20/11/2008

    Imperial Armour Model Master Class Vol 1

    I thought i would write a quick review of Imperial Armour Model Master Class Vol 1 which ive just recieved from my darling wife as a birthday present!!

    First off - the presentation of the book. As usual for Forge World, it is an impecably packaged product, being presented in full colour and on glossy paper. As per the Imperial Armour books it is an 'oversized' book (roughly the same size as the Apocalypse book from GW), and the photos are lavish with detailed text accompanying each photo.

    The book is split in to 17 chapters. Each chapter focussing solely on one model / diorama at a time. Each chapter is long enough to give you the key points with regards to this model. By doing it in this way, it forces you to read the whole book before you jump in, because techniques sometimes feel like they are spread throughout the book. However, each technique is demonstrated clearly and with simple steps.


    Lots of the book focuses on the preperation and painting of rust and weathering (A good thing!)
    Unusually for a Games Workshop publication it actually includes references to materials other than those manufactured by GW themselves, in this case specifically mentioning several brands of thinners and pigments to use.

    At the back of the book is a small gallery showing a battle taking place over a custom gaming table with apocalypse size forces, including a couple of titans. These photos are simply stunning! Infact in many ways this book is worth possessing simply for the quality of the photos, even without the text (although the text is very good). Simply looking at other peoples work can inspire new ideas for working with your own models.

    This book is clearly not aimed at the inexperienced modeller however. In several places on the book cover and in the introduction is clearly states this - with good reason! Without a good grounding in basic / moderate miniature preperation and painting it will be hard to make the best use of the information contained within.

    I have absolutely no reservations in recommending Imperial Armour Model Masterclass - although it is an expensive book to purchase (£26), in my opinion it should be required reading for any serious 40K treadhead! The photos are excellent, the text is informative and well written and the layout is clear

    19/10/2008

    Imperial Guard Font...

    Ive been playing around with airbrushing Logos and vehicle identifiers on to tanks recently. I find that transfers never set properly and never look exactly right. Ill do a full post on the technique i use in a later post, but for the moment, i wanted to discuss fonts. Originally i was just using Arial in my tests and it never looked quite right. When i started to google it occured to me (duh!) that military vehicles use a military font. So after a bit of googling i found Da Font which has an excellent collection of military fonts. I went for Gunplay which nicely matches the style i am going for...

    15/10/2008

    Another tank weathering site...

    Just stumbled across this site which details a few other ways of weathering AFV's - A nice one that id not come across before includes using artists pencils...

    08/10/2008

    More tank modelling sites...

    So ive just found two more ultra cool tank modelling blogs / sites.
    The first is Ultrawerke - This site focusses on tutorials that apply to sci fi and "real world" tanks. It is very handy reference site...
    The second site is Fichtenfoo, an oddly named site, but which has an excellent tutorial on putting together a WW2 Russian tank - Almost all of the techniques are usable on 40K Tanks tho

    05/10/2008

    Cool tank modelling site

    Ive just come across panzermodelbau - a very cool site that has lots of galleries and diaramas of WW2 Panzer tanks. Whilst the site deals with "Real world" tanks it is an excellent source of painting ideas for Sci-fi tanks and vehicles